Viewing Annotations
You can view annotations using the Map Annotations tool. You can also toggle existing annotations on and off to change their visibility on the map.
Toggling the Map Annotations Tool
The easiest way to access existing annotations is to toggle the Map Annotations tool ![]() .
.
-
 . The Map Annotations tool opens and displays all available annotation groups.
 -
To close the Map Annotations tool, select Map Annotations

Use the Map Annotations tool ![]() when you want to:
when you want to:
-
Create new annotations directly on the map (i.e., not associated with a specific image; see Drawing New Annotations).
-
Delete annotations or annotation groups
-
Edit annotations (e.g., change their properties or shape)
-
Rename annotation groups
-
Toggle annotations or annotation groups
-
View annotation groups
-
View annotations associated with imagery in the Imagery panel
Toggling Annotation Groups
You can toggle entire annotation groups using the Map Annotations tool ![]() .
.
-
. The Map Annotations tool opens and displays all available annotation groups.
By default, all annotation groups are selected (i.e., visible). If an annotation group is shown in the list but is not selected, it is currently hidden.
-
Do one of the following, depending on whether you want to hide or show the annotation group.
-
Hide an Annotation Group Next to the annotation group(s) you want to hide, clear the checkbox.
-
Show an Annotation Group Next to the annotation group(s) you want to show, select the checkbox.
-
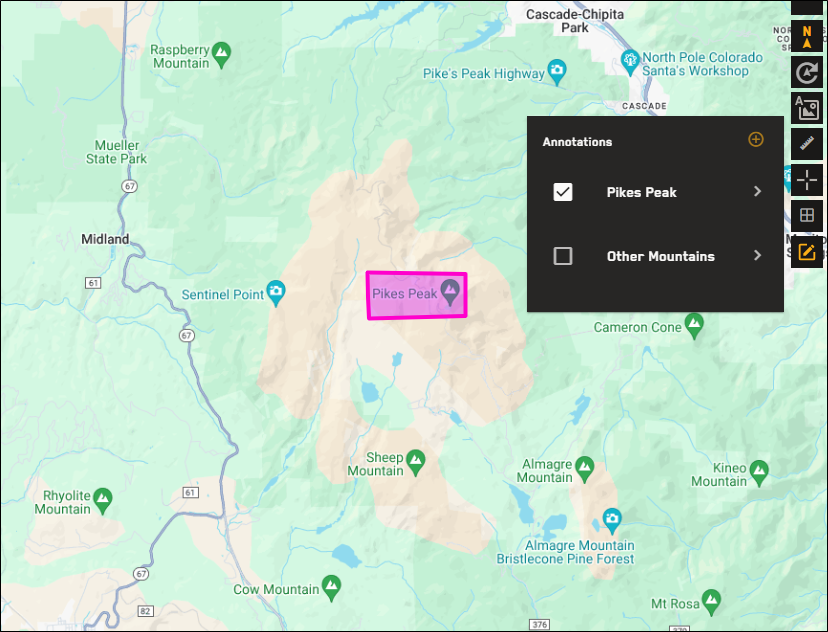
In this example, there are two annotation groups: one with green rectangles that highlight several mountain peaks, and one with a single pink rectangle that highlights Pikes Peak.
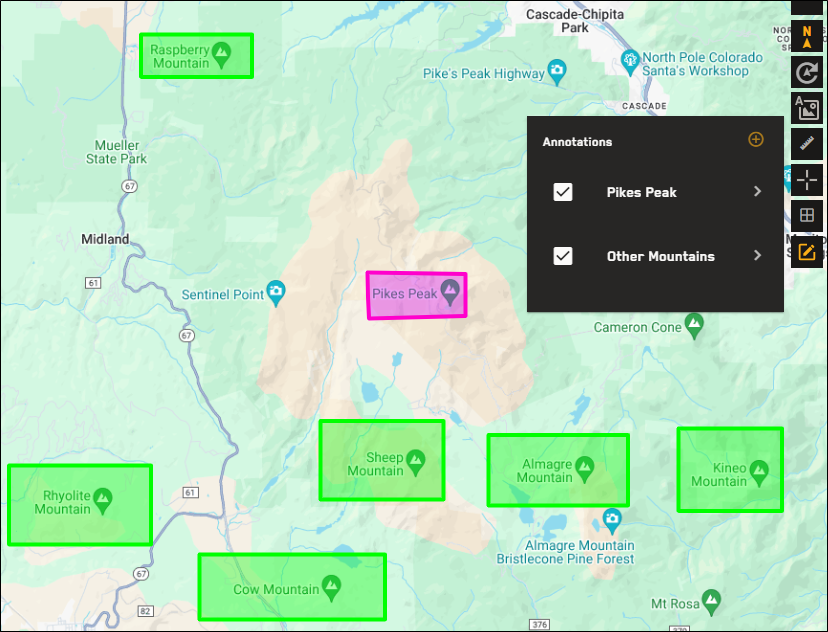
When you clear the checkbox next to the Other Mountains group, you only see the Pikes Peak annotation. The Other Mountains annotation group still exists, but it is hidden.
Toggling Individual Annotations
You can use the Properties function to toggle individual annotations. This is useful if you need to show or hide only part of an annotations group.
-
. The Map Annotations tool opens and displays all available annotation groups.
-
Select the annotation group that contains the annotation(s) you want to toggle. The annotation group expands to display all annotations in the group.
-
Next to the annotation you want to edit, select the menu
 , then select Properties. The Properties dialog opens.
 -
In the Properties dialog, do one of the following, depending on whether you want to hide or show the annotation.
-
Hide the Annotation Clear the checkboxes next to color properties, such as fill.
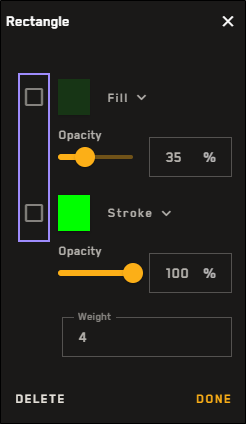
This particular annotation will not be displayed because its fill and stroke properties are turned off.
-
Show the Annotation Select the checkboxes next to color properties, such as fill.
-
-
To close the Properties dialog, select Done.
-
Select Save. The annotations group closes automatically.
The Properties dialog is primarily used to edit the properties of the annotation. See Editing Annotations.
More About Viewing Annotations
-
Annotations can be associated with an image or drawn anywhere on the map.
When you select an annotation group that is associated with an image, the Imagery panel locks and the image displays in the Imagery panel.
If multiple annotation groups are available, the image displayed in the Imagery panel changes when you select different annotation groups.
-
When you select an annotation group, the viewport zooms to the extent of the annotations in the group.