Monitoring Areas
Create a monitor to receive an email notification when new imagery acquisitions intersecting
Creating Monitors
Create a monitor to receive a notification when new imagery acquisitions intersecting your
-
Select Areas. The Areas panel opens.
-
(Optional) If you have not yet created an area, add an area over the part of the map you want to monitor. See Drawing Areas.
-
Next to the
 , then select Create Monitor.
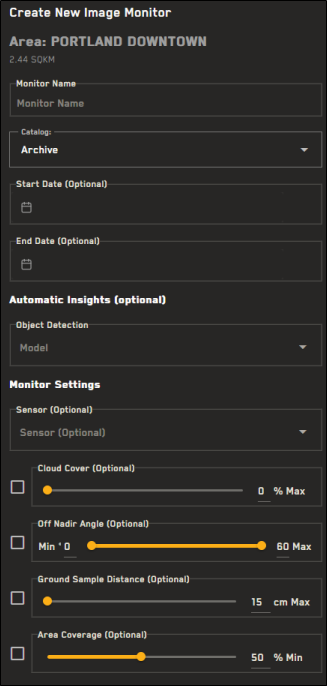
The Create New Image Monitor panel.
-
In the fields, enter details about the monitor.
-
Monitor Name A name for the monitor.
The Monitor Name appears in monitor's email alerts. Although it is not required, you may want to use a unique name. You should also use a name that makes it easy to identify the monitor, especially if you have multiple monitors set.
-
Catalog (Default: Archive) Select a catalog to monitor for new imagery acquisitions.
-
Start Date (Optional) Use the calendar picker to select the date you want the system to begin monitoring for new imagery in
-
End Date (Optional) Use the calendar picker to select the date you want the system to stop monitoring for new imagery in
-
Automatic Insights (Optional; Archive catalog only) Receive an alert if new object detections are available in your area. From the drop-down, select one or more of the following object detection filters:
-
Aircraft
-
Construction
-
Military
-
Vehicle
-
Vessel
-
-
Monitor Settings (Optional) Add monitor filters to receive an alert if new imagery matches your filter settings. Imagery that does not match the filters will not trigger an alert. You can set the following filters:
-
Sensor
-
Cloud Cover (0% – 99%)
-
Off Nadir Angle (0° – 60°)
-
Ground Sample Distance (15 cm – 500 cm)
-
Area Coverage (1% – 100%)
When you change a filter's default settings, the checkbox next to the filter's name is automatically selected. If you want to remove a filter, clear the checkbox next to the filter's name.
-
-
Email Alerts Recipient Enter one or more email addresses to receive alerts when new imagery intersects
-
-
Select Create Monitor.
Viewing Monitors
You can view details about your monitors in the Areas panel.
-
If there are one or more monitors associated with an area, Monitors and the number of monitors displays with the general area information.
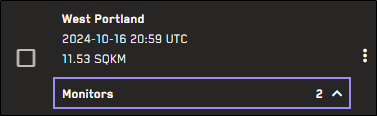
There are two monitors associated with this area.
-
To see the area's available monitors, expand the drop-down arrow
 next to the number of available monitors.
 -
To see information about a monitor, hover over it. A pop-up displays the monitor's creation/last modified date, start and end dates, email recipients, and whether or not the monitor is currently active.
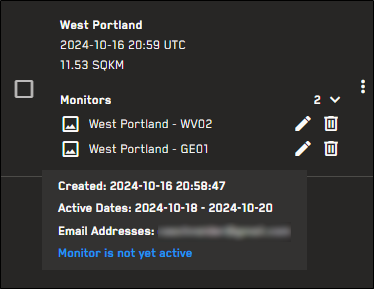
Hover over a monitor to view its details.
Editing Monitors
You can make changes to a monitor at any time.
You can only edit or delete monitors you created. Users with monitor admin permissions can edit or delete any monitor.
-
Select Areas. The Areas panel opens.
-
Locate the area with the monitor you want to edit, then expand the drop-down arrow
next to the number of available monitors. -
Next to the monitor you want to edit, select Edit
 . The Editing Image Monitor panel opens.
 -
In the fields, edit the monitor name, start/end dates, filter criteria, and/or email alert recipients.
You can only edit future start dates (i.e., for inactive monitors).
The Catalog option is unavailable when editing existing monitors.
When you change a filter's default settings, the checkbox next to the filter's name is automatically selected. If you want to remove a filter, clear the checkbox next to the filter's name.
-
Select Save Changes. A confirmation notifies you that your monitor was successfully updated.
Deleting Monitors
If you no longer need a monitor, you can delete it.
You can only edit or delete monitors you created. Users with monitor admin permissions can edit or delete any monitor.
-
Select Areas. The Areas panel opens.
-
Locate the area with the monitor you want to delete, then expand the drop-down arrow
next to the number of available monitors. -
Next to the monitor you want to delete, select Delete
 .
. -
A confirmation dialog asks if you want to delete the monitor. To delete the monitor, select Delete Monitor. Otherwise, select Cancel.
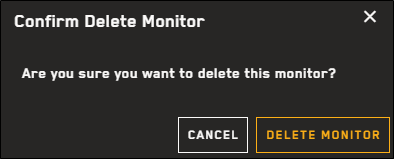
Deleting a monitor is permanent. You cannot recover a deleted monitor; if you want to use a deleted monitor again, you will need to recreate it.
More About Monitoring Areas
-
If you edit
-
Deleting