Ordering Object Detections for an Area
The instructions on this page apply to orders placed through the Hub user interface only. It does not apply to orders placed via the Ordering API.
Vantor's Artificial Intelligence/Machine Learning (AI/ML) object detection offerings leverage advanced artificial intelligence and machine learning technologies to provide precise and efficient object detection across various domains. The robust models are designed to identify and classify a wide range of objects, including aircraft, vehicles, vessels, construction equipment, and military equipment. By utilizing high-resolution satellite imagery and sophisticated algorithms, Vantor's object detection solutions enable enhanced situational awareness and decision-making for clients in defense, intelligence, commercial, and humanitarian sectors. These capabilities support critical operations such as monitoring, security, asset management, and disaster response, ensuring reliable and actionable insights in real-time.
You can order object detections for any new or existing area of interest.
The Object Detections Order wizard.
-
Select Areas. The Areas panel opens.
-
(Optional) If necessary, add a new area. See Drawing Areas or Importing Areas.
-
Next to the area for which you want to order object detections, select the menu
 , then select Order Object Detections. The Object Detections Order wizard opens.
 -
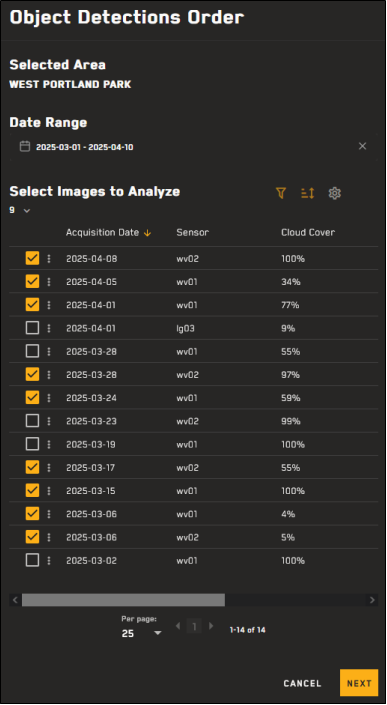
In the Date Range field, use the calendar picker to select a date range. This filters the available imagery over the area.
-
In the Select Images to Analyze section, select one or more images for which you want to order object detections.
Use the Filters
 , Sort
  , and Settings
  tools to further refine your imagery results.
 See Filtering Imagery, Sorting and Stacking Imagery, and Working with Metadata: Changing Visible Metadata Attributes.
-
Select Next. The wizard advances to the next page.
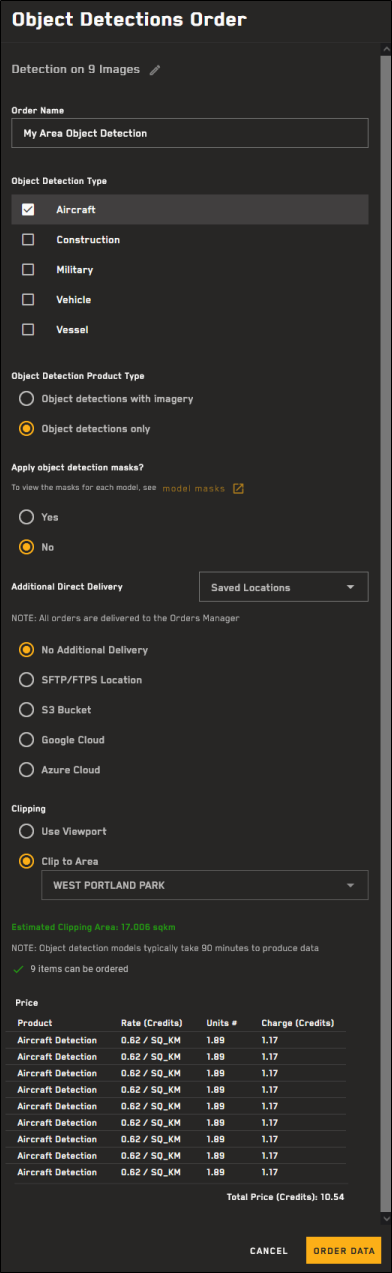
The top of the second page of the wizard indicates how many images are in your detection. If you want to change your imagery selections, select the Edit
 icon to return to the first page of the wizard.
-
(Optional) In the Order Name field, enter a new name for the order.
The Order Name field is automatically populated based on imagery parameters. You may want to enter a new, unique name to make your order more easily identifiable in the Orders panel.
-
Complete each section to define your order.
 Object Detection Type
-
Select one or more object detection to order.
Options
-
Aircraft
-
Construction
-
Military
-
Vehicle
-
Vessel
For more information about the subclasses included in each model type, see https://developers.vantor.com/docs/ordering/guides/object-detection-ordering#model-classes.
-
Object Detection Product Type
-
Select how you would like your object detections delivered:
-
Object detections with imagery
-
Object detections only
-
Apply Object Detection Masks?
-
Select whether or not you want to apply object detection masks.
Masks are used to include rather than exclude object detections. Only object detections that intersect the mask are included in the results.
For example, enabling the Vehicle model's mask limits detections to vehicles found on land. Cars on a ferry or container ship would be excluded.
To view the masks for each model, select the link in the Object Detections Order panel.
Additional
By default, all orders are delivered to the Orders Manager.
If you want to send your order to an additional file transfer location, select your desired location.
Options
-
No Additional Delivery (Default)
-
-
(Optional) If you want to use a previously saved location for the order, select it from the Saved Locations drop-down.
-
Select your protocol, then enter your credentials, host, port, and directory.
-
To verify the connection, select Test Connection.
A successful connection test is required to save the location and to
-
(Optional) To save the location to use again later, select Save as Location. The location is added to the Saved Locations drop-down.
-
-
-
(Optional) If you want to use a previously saved location for the order, select it from the Saved Locations drop-down.
-
Enter your S3 bucket, folder, region, IAM access key, secret access key, and optional session token.
-
Use the Session Token field if you have a temporary STS token.
-
For regular access keys, leave the Session Token field blank.
Be aware that STS tokens are valid for a maximum of 12 hours. As such, STS tokens are best suited for manually sending an order to an additional location after the initial order has been completed.
Your S3 bucket must be in the AWS commercial cloud.
-
-
To verify the connection, select Test Connection.
A successful connection test is required to save the location and to
-
(Optional) To save the location to use again later, select Save as Location. The location is added to the Saved Locations drop-down.
-
-
-
(Optional) If you want to use a previously saved location for the order, select it from the Saved Locations drop-down.
-
Enter your service key, bucket, and folder.
To select a service key from a location on your computer, select the paperclip
 .
. -
To verify the connection, select Test Connection.
A successful connection test is required to save the location and to
-
(Optional) To save the location to use again later, select Save as Location. The location is added to the Saved Locations drop-down.
-
-
-
(Optional) If you want to use a previously saved location for the order, select it from the Saved Locations drop-down.
-
Enter your connection string, bucket, and folder.
-
To verify the connection, select Test Connection.
A successful connection test is required to save the location and to
-
(Optional) To save the location to use again later, select Save as Location. The location is added to the Saved Locations drop-down.
-
-
-
(Optional) If you want to use a previously saved location for the order, select it from the Saved Locations drop-down.
-
Clipping
-
Select how you would like to clip the ordered area.
Options
-
-
To draw an AOI for the current viewport, select Re-Define.
-
To automatically zoom to the largest allowable clipped area, select Max Fit.
-
To automatically zoom to the smallest allowable clipped area, select Min Fit.
Min Fit and Max Fit create areas based on center of the current viewport. Use the Re-Define, zoom and pan, and search tools to roughly select your desired location before using either of these zoom options.
-
-
-
The search drop-down displays up to 25 saved areas. Selecting an area draws the AOI on the map and recalculates the order price for the selected area.
If you try to place an order using an area that intersects with a georestricted location, you will receive an error.
-
Price
As you make and update order selections, the Price section displays a real-time quote.
-
Review the quote.
In these two images, the clipping area affects the total charge because the number of units (sq km) has changed.
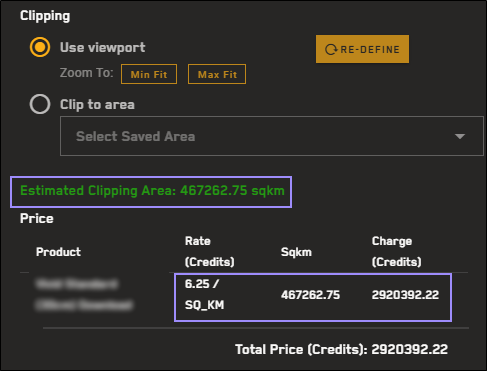
This order is based on the Max Fit of the viewport, and costs 2594.105 credits.
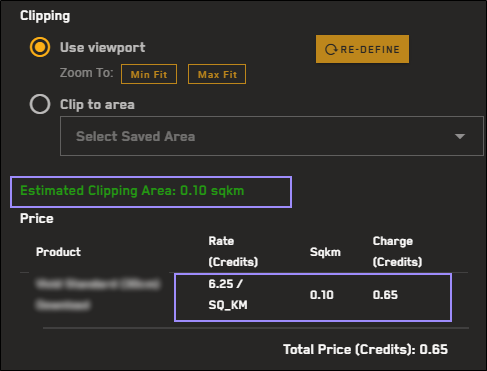
This order is based on the Min Fit of the viewport, and costs 13.614 credits.
Note that rates shown here are for illustrative purposes only. They are not applicable to all imagery products, and they may not reflect rates in your instance of Hub.
There is no cost for archive images ingested to streaming.
-
-
Select Order Data.
-
In the confirmation dialog, check that the order looks correct, then select Place Order.
After placing the order, a final confirmation displays your order ID, order name, order date, your order's options, and the total number of credits charged. Select Place Order to finish placing your order or Cancel to make edits.
A final confirmation displays your order ID, order name, and order date. Select OK.
Track an order's status and download completed orders in the Orders panel. Orders expire after two weeks. See Orders.
Object detection models typically take at least 90 minutes to produce data. Thank you for your patience.
If an object detection order is created by a monitor, the monitor name and area name display in both the notification emails and the order information for that order.