Overview: Projects
You can work with projects in two ways:
-
Projects Panel Shows all available projects. In the Projects panel, you can access the project menu
 for any project in the system. You can also see basic project details and view and copy source package information.
 -
Expanded Projects Interface View and edit any aspect of a single project. In this interface, you can select and edit project imagery, view and add comments, and create and edit monitors.
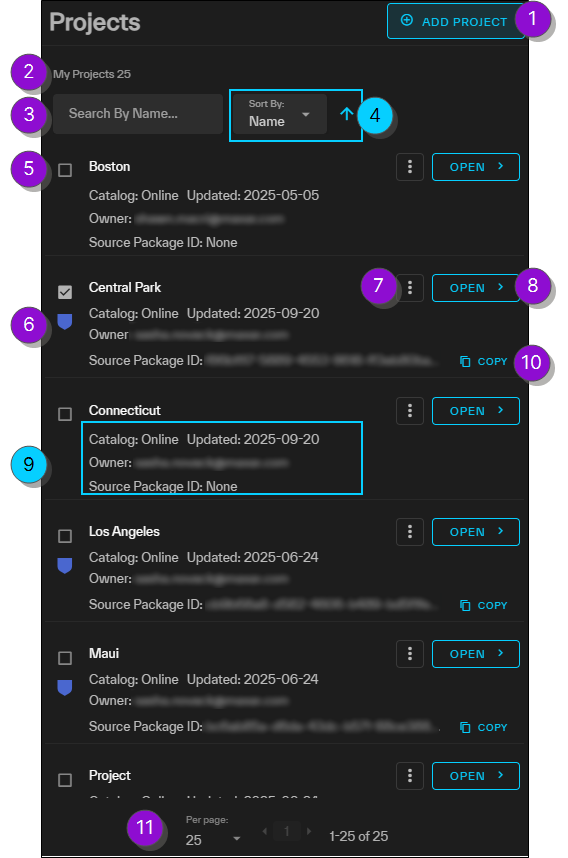
Overview: Projects Panel
Use the overview image and corresponding table to locate tools in the Projects panel.
| Numbered Area / Icon | Description | User Guide References | ||||||||
|---|---|---|---|---|---|---|---|---|---|---|
|
1 Add Project |
Add or import a project. | |||||||||
|
2 My Projects |
Displays the total number of projects available. |
|
||||||||
|
3 Search |
Enter a keyword to search for a project. The Projects panel automatically filters as you type. |
|
||||||||
|
4 Sort By |
Sort projects by Last Update date, Creation Date, or Name.
|
|
||||||||
|
5 Project Selection Checkbox
|
Zooms to the extent of the project area in the viewport. |
|
||||||||
|
6 Private
|
Projects that are private are marked with a blue shield. Private projects are only visible to you. |
|
||||||||
|
7 Project Menu
|
Opens the Project Menu. Use the Project Menu to:
|
|||||||||
|
8 Open |
Open the project in the expanded project interface. From here you can edit the project, create monitors, add comments, and more. | |||||||||
|
9 Project Details |
View general information about the project, including the catalog, the last updated date, the owner, and the source package ID (if available). | |||||||||
|
10 Copy Source Package ID |
Copy the Source Package ID for use in ArcGIS Pro or ArcMap. | |||||||||
|
11 |
Navigate between pages of projects and change the number of projects displayed on each page of the Projects panel.
|
| Numbered Area / Icon | Description | ||||||||
|---|---|---|---|---|---|---|---|---|---|
|
1 Add Project |
Add or import a project. | ||||||||
|
2 My Projects |
Displays the total number of projects available. | ||||||||
|
3 Search |
Enter a keyword to search for a project. The Projects panel automatically filters as you type. | ||||||||
|
4 Sort By
|
Sort projects by Last Update date, Creation Date, or Name.
|
||||||||
|
5 Project Selection Checkbox
|
Zooms to the extent of the project area in the viewport. |
||||||||
|
6 Private
|
Projects that are private are marked with a blue shield. Private projects are only visible to you. | ||||||||
|
7 Project Menu
|
Opens the Project Menu. Use the Project Menu to:
|
||||||||
|
8 Open |
Open the project in the expanded project interface. From here you can edit the project, create monitors, add comments, and more. | ||||||||
|
9 Project Details |
View general information about the project, including the catalog, the last updated date, the owner, and the source package ID (if available). | ||||||||
|
10 Copy Source Package ID |
Copy the Source Package ID for use in ArcGIS Pro or ArcMap. | ||||||||
|
11 |
Navigate between pages of projects and change the number of projects displayed on each page of the Projects panel.
|
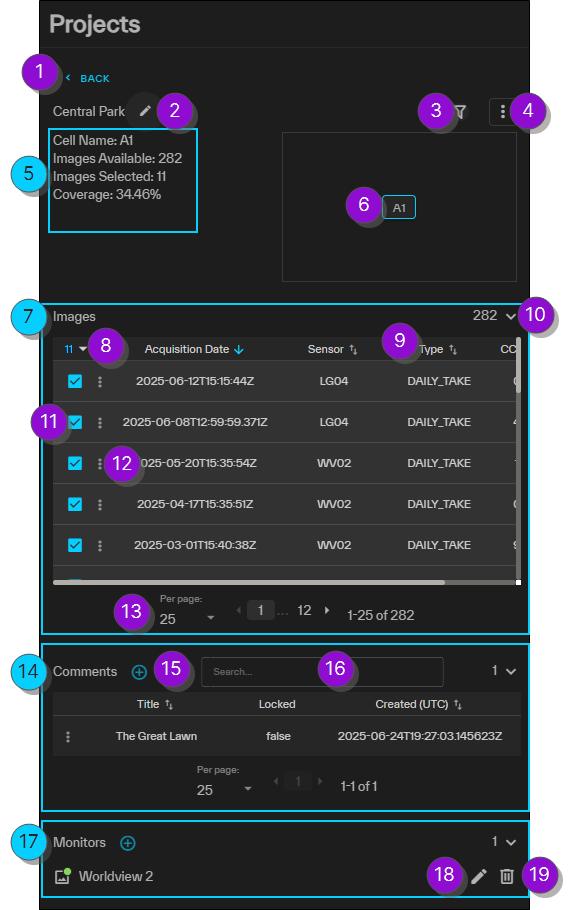
Overview: Expanded Projects Interface
Use the overview image and corresponding table to locate tools in the expanded Projects interface.
| Numbered Area / Icon | Description | User Guide References | ||||||||
|---|---|---|---|---|---|---|---|---|---|---|
|
1 Back |
Close the expanded Projects interface and return to the Projects panel. |
|
||||||||
|
2 Project Name / Edit
|
The project name. To rename the project, select Edit |
|
||||||||
|
3 Filter Imagery
|
Open the Filters dialog. | |||||||||
|
4 Project Menu
|
Open the Project Menu. Use the Project Menu to:
|
|||||||||
|
5 Cell Details |
Information about the active cell.
|
|||||||||
|
6 Cell Locator |
The highlighted square indicates the current cell. Hover over a cell to highlight it in the viewport. Select a cell to zoom to it and make it active. |
|||||||||
|
7 Images |
Shows available and selected imagery for the selected cell. Change the stacking order and view image metadata. The total number of available images in the cell displays next to the expand/collapse arrow. |
|||||||||
|
8 Number of Imagery Selections / With Selected Menu |
The number of images that are currently selected. Select the drop-down arrow |
|||||||||
|
9 Sort
|
Sort a column in ascending or descending order.
|
|||||||||
|
10 Expand/Collapse Section
|
Select the arrow to expand or collapse the Images, Comments, or Monitors sections. | |||||||||
|
11 Image Selection Checkbox
|
Select one or more images. | |||||||||
|
12 Image Menu
|
Open the Image Menu. Use the Image Menu in the expanded Projects interface to:
|
|||||||||
|
13 |
Navigate between pages of images or comments, and change the number of images or comments displayed on each page of the expanded Projects interface.
|
|||||||||
|
14 Comments |
Read and add project comments. |
|||||||||
|
15 Add New
|
Add a new comment or monitor. |
|||||||||
|
16 Search Comments |
To search available comments, enter a keyword in the Search field . The Comments section automatically filters as you type. | |||||||||
|
17 Monitors |
Create a monitor to receive an email notification when new imagery acquisitions intersect your project area. |
|||||||||
|
18 Edit Monitor |
Edit a monitor. |
|||||||||
|
19 Delete Monitor |
Delete a monitor. |
| Numbered Area / Icon | Description | ||||||||
|---|---|---|---|---|---|---|---|---|---|
|
1 Add Project |
Add or import a project. | ||||||||
|
2 My Projects |
Displays the total number of projects available. | ||||||||
|
3 Search |
Enter a keyword to search for a project. The Projects panel automatically filters as you type. | ||||||||
|
4 Sort By
|
Sort projects by Last Update date, Creation Date, or Name.
|
||||||||
|
5 Project Selection Checkbox
|
Zooms to the extent of the project area in the viewport. |
||||||||
|
6 Private
|
Projects that are private are marked with a blue shield. Private projects are only visible to you. | ||||||||
|
7 Project Menu
|
Opens the Project Menu. Use the Project Menu to:
|
||||||||
|
8 Open |
Open the project in the expanded project interface. From here you can edit the project, create monitors, add comments, and more. | ||||||||
|
9 Project Details |
View general information about the project, including the catalog, the last updated date, the owner, and the source package ID (if available). | ||||||||
|
10 Copy Source Package ID |
Copy the Source Package ID for use in ArcGIS Pro or ArcMap. | ||||||||
|
11 |
Navigate between pages of projects and change the number of projects displayed on each page of the Projects panel.
|